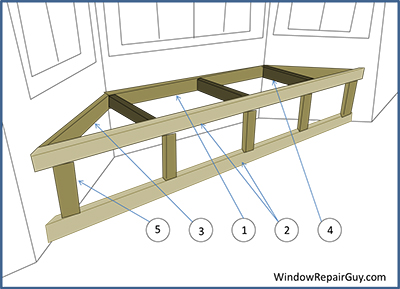
How to Build a Bay Window Seat with Storage Step 2: Building the Support Frame
Measure the width of the outer-wall to determine the length of the rear 2×4 support. Assuming the short walls are at a 45 degree angle, miter both ends of the 2×4, item 1, at a 22-1/2 degree angle. Use a stud finder to locate the existing wall studs. Anchor a 2×4 across the full width of the outermost wall using the 3-1/2” wood screws. Place a level on top of the 2×4 at the time of installation to ensure your bench will be level upon completion. If your desired finish height is 18 inches, then the top of the 2×4 should be 17-1/4” inches above the floor to allow for the ¾” plywood deck.
To determine the length of the outer 2×4 supports (item 2), measure out from the rear wall 24 inches or less if your seat will be smaller. For instance if your existing bay window is only 22 inches deep your seating area should only be 20 inches deep, or about 2” less than the depth of your window area. Measure the width of the seating area at this point. Before you take the measurement, you should either remove the baseboard entirely or notch it to allow for installation of the lower 2×4 (item 2).
Cut two 2×4’s (item 2), to this dimension and miter both ends at an angle of 45 degrees. Using the 3-1/2” wood screws, mount one 2 x4 at the floor level. Measuring up from the floor 17-1/4”, mount the second 2×4. Make sure the top of the upper 2×4 (item 2), is aligned vertically with the top of item 1, while the depth is perfectly aligned with the front face of the lower 2×4 (item 2).
Measuring along the 45 degree bay area walls, determine the distance between item 1 and item 2 and cut two, 2×4’s (item 3)to this dimension. Miter both ends of item 3 at an angle of 22-1/2 degrees. Screw item 3 to the existing wall studs using 3-1/2” wood screws.
Depending on the width of your bay window seat with storage, you will need to add 3 or more seat deck supports item 4. The maximum space between the seat area supports should be 24”. Measure the distance between the upper supports item 1 & item 2 and use this dimension to cut item 4 from a length of 2×4. Install item 4 using 3-1/2” wood screws.
Measure the distance between the upper and lower item 2 supports and use this dimension to cut item 5 the vertical 2×4 supports. Install one item 5 vertical support adjacent to each of the item 4 horizontal supports. You will need to install 2 additional item 5 vertical supports at each end of the structure. Again, use the 3-1/2” screws to attach item 4 to item 2.
Contact Info:
If you are searching for a professional glass replacement contractor to help you with your Bay Window repair or installation in the Naperville or Plainfield Illinois and surrounding areas; contact One Source Renovation, LLC at WindowRepairGuy.com or give us a call at (815)-634-8922.
