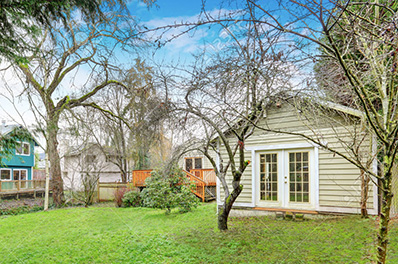
Installing Garden Shed French Doors will not only aesthetically improve the appearance of your garden shed, your new windows will also illuminate the interior of your shed with natural sunlight. Garden shed doors tend to be built with solid wood, mainly for security reasons. The problem is that if you want to do a little work on your tools while inside your shed, you would need to keep the doors wide open to let the light in. Installing French Doors on your garden shed solves this issue, while at the same time beautifying your backyard.
For smaller garden sheds, like the one pictured above, you can accomplish the same thing by removing the solid entry door and replacing it with a glass door. Take it one step further and add a sidelight with grids or muntins, for a stunning new look and even more light. While it may be true that the installation of glass windows and doors may raise security concerns for some, many homeowners today live in secure gated communities with very low crime rates. In these upscale neighborhoods, visual appearance trumps security needs every time.
How to Install Garden Shed French Doors
Follow these quick and easy steps for installation of your new garden shed French Doors. It’s worth it to take the time and watch the video below to get a better understanding of the various steps.

Remove the Old Door: Carefully remove the existing door including all the hardware, hinges, strike plates, the old door header, and the bottom seals.
Frame the New Opening: Assuming your new French Doors are larger than the current opening, you will need to frame the new opening to suit the width of the new door. Measure the overall width and height of the door frame assembly and add ¼” to each side to find the target finish opening. This ¼” gap will be used shim the assembly to make it perfectly square for smooth operation of the doors. You will be adding a pair of 2×4’s on each side of the opening so you will need to cut back the existing framing an additional 3” on each side to make room for the new framing. Why 3” you may ask? To properly support the new header, you need a “King Stud,” which protrudes all the way up to the underside of the top rail. Adjacent to the King Stud will be a “Jack Stud” which will protrude to the top of the door opening and will provide support for the new header.
Construct the New Header: To provide adequate support for the roof of your shed you need to build a header to span the width of the opening. The new header will actually be 3” longer than the finished width of the raw opening so it can sit on top of the Jack Studs. Generally speaking, a pair of 2×6’s with a ½” sheet of plywood sandwiched in between, will be the perfect header size to install above your new garden shed French Doors.
Install the Sill Plate Flashing: Apply a generous bead of caulking along the bottom of the door opening then use a roller to firmly seat the aluminum flashing.
Set the Door Assembly: Before you raise the door assembly, apply a generous bead of caulking around the perimeter of the frame. Then with the door assembly in place, use wood shims to accurately square the door frame and fill the ¼” gap. Place the shims 12 inches apart along both sides and along the top of the frame. The shim location is the point where you will screw or nail your frame in place. Fill the remainder of the ¼” gap with self-expanding spray foam.
Final Assembly: Install the hardware and all flashing and caulk the entire perimeter of the frame. When the caulking is fully cured, you can paint the trim to match the color of the existing trim.
Too many words, too little time. Not to worry, I found this handy video which explains the entire process and is much easier to follow along. As the old saying goes “a picture is worth a thousand words,” check it out.
Contact Us:
Do you still have questions about how to install your garden shed French Doors? Contact One Source Renovation, LLC at WindowRepairGuy.com or give us a call at (815)-634-8922.