So you have just moved into your dream home in Naperville or Aurora, the weather is beautiful, and you decide to open your windows and let in the fresh air. Oops, no window screens. This must be one of the things the home inspector should have discovered prior to closing. No worries, you can build your own window screens. Or you can hire a local contractor like WindowRepairGuy.com to build replacement window screens for you.
Step 1:
Carefully measure the inside dimensions of each of the windows in your home to determine the total amount of screen frame material you will need for the project. To calculate the total length of framing required for each individual window add 2 times the height and 2 times the width. Therefore; a 2FT x 3FT window will require a total of 10FT of screen framing, plus scrap. It’s a good idea to make a detailed list of each window size and location as you go to save time later.
Step 2:
Measure it again. Remember the old adage “Measure Twice, Cut Once.”
Step 3:
Now tally up all of the windows so you can head to the local hardware store to purchase the frame material. Be sure to add approximately 10% to your number to allow for scrap, or short ends of drop material. Buy 4 corner brackets for each window screen and a roll of screen material.
Step 4:
 Cut the metal screen frame to suit your first window. Be sure to subtract the width of the 2 corner brackets. If you use the new style “L” brackets for the corners, you will eliminate the need for a miter cut. For a novice handyman, this will also eliminate a lot of scrap. To ensure that both vertical frame pieces are exactly the same length, clamp two pieces of frame stock together and cut them simultaneously. I hope you remembered to pick up a new, sharp, fine-cut, blade for your hacksaw when you were at the hardware store? Repeat this step for the two horizontal frame sections.
Step 5:
Tap the corner brackets into the metal frame. Perform a fit-test in the window opening before you install the screen.
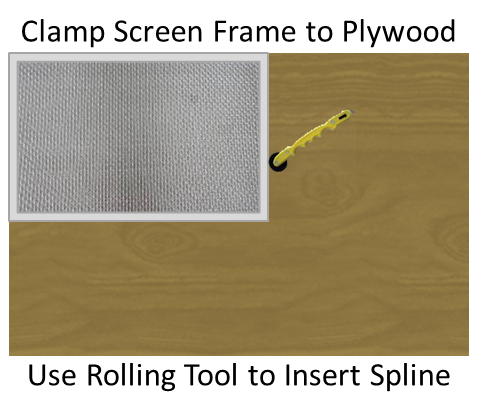
Step 6:
Clamp the frame to a sheet of plywood. Align the frame with one corner of the plywood to keep everything square. Using grandma’s kitchen table would be a bad idea!
Step 7:
Roll out the screen material and cut it roughly to the overall dimensions of the screen frame. Lay a block of wood on all 4 edges so the screen will lay flat while you work it into the grooves.
Step 8:
Use a window screen rolling tool to push the screen and spline into the groove. You may need to use a flat head screwdriver to access the corners where the roller can’t quite reach.
Step 9:
Trim any excess screen and spline using a sharp utility knife. If you carefully place the tip of the blade into the window screen frame groove, you can follow along in the groove to ensure a nice straight cut and a professional job.
If your first window screen was a success, repeat steps 4 through 9 for the remaining windows in your home.
If you don’t have the time, tools, or skill to build your own replacement window screens, contact One Source Renovation, LLC at
WindowRepairGuy.com for a FREE Quote. (815)-634-8922