If you live in a northern state with a colder climate such as Illinois your home should already have a storm door. If it doesn’t, you should consider installing one before the next cold front heads your direction. A simple storm door installation can be one of the easiest ways to improve the efficiency of your home heating and cut down on cold winter drafts.
You may be worried that a storm door installation project is difficult and complex? Not at all, with the kits that are available today, your installation should be quick and easy. Still not convinced? Then simply hire a professional contractor like One Source Renovation to complete the task for you. If you feel up to the task then follow these tips for a successful project:
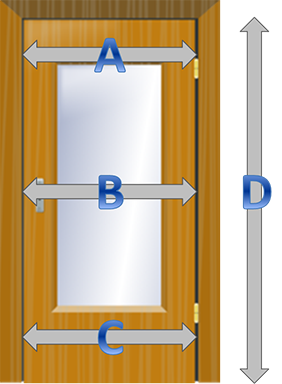
Step 1: Measure The Opening
Before you order your storm door be sure to carefully measure the opening. Measure the width in three locations to be sure you capture the smallest dimension. With any luck the dimensions you take will match the size of a standard storm door. In some cases you can get away with a simple “Z” spacer to make up for any discrepancy in width. Otherwise you will be forced to order a custom width storm door. Be sure to subtract ¼” from the physical width dimensions allow for clearance when you install your new door.
Step 2: Install the Rain Cap
Many storm door installation kits come with a Rain Cap. In most cases this is the first installation step. Refer the manufacturer’s instructions to be sure.
Step 3: Install the Hinge Side Z-Bar Spacer
Carefully measure the vertical dimension on the hinge side of the door opening. Use this information to trim the Z-Bar to fit the opening. Use a hacksaw to cut the Z-Bar to the proper length.
Step 4: Mount the Storm Door
Close the exterior door of your home and place the storm door inside the frame opening. Push the door towards the hinge side of the opening and secure the top and bottom with 2 screws. Use a 4 foot level to confirm that the door is plumb before you install the screws. Open the storm door so you can access the hinge side Z-Bar and install the remaining screws.
Step 5: Install the Upper Z-Bar
Leaving a ¼” gap above the door, securely fasten the upper Z-Bar.
Step 6: Trim the Latch Side Z-Bar
Carefully measure the vertical dimension from the door sill to the underside of the rain cap. Trim the latch side Z-Bar with a hacksaw. If possible cut the bottom of the Z-Bar at the same angle as the slope of the sill itself for a more professional installation. Secure the Z-Bar using the screws that are included in your storm door installation kit.
Step 7: Install the Accessories
Following the manufacturer’s instructions, install the lower door sweep, the door closure unit, and the handle and latch set.
Contact Us:
Looking for a Storm Door Installation Specialist? Give us a call or read our other articles about storm doors. If you are searching for a professional glass replacement contractor to help you with your installation in Illinois: contact One Source Renovation, LLC at WindowRepairGuy.com or give us a call at (815)-634-8922.