Adding a window light box to a dark room in your home may the perfect solution to illuminate the poorly lit space. Basements, particularly in northern homes can be dark and dingy due to the tiny windows just above ground level. The same can be true for attics that have been converted into a living spaces or toy room for the kids. Sometimes it is all but impossible to add a real window due to structural constraints. If there are few or no windows in the space, installing a window light box can provide the feeling of natural light entering the room.
How to Build a Window Light Box
I found this video which demonstrates an inexpensive way to build your own window light box using readily available items. You can watch the video to see each step in action or carry on reading below to review the steps one by one.
[youtube https://www.youtube.com/watch?v=tCX6L09vInM?rel=0&w=560&h=315]
Glass: You will need 2 large pcs of glass. You can usually find this at your local hardware store. The video offers a cost-saving tip. You may have some luck finding a matching pair of picture frames at a thrift shop and reuse the old glass. You can build the window lights in just about any size to suit your needs. Something along the lines of 2 ft x 3 ft or 20” x 30” could be a suitable size for your light box.
Cut the Supports: Use a table saw to cut the support strips and outer-frame. Use standard 1×4 boards for the outer-frame and cut them to length so they match the width and length of the glass. Be sure to add 1-1/2” to the length of the end frame boards to overlap the longitudinal boards at the corners. Cut the MDF support strips to match the inside dimensions of your box.
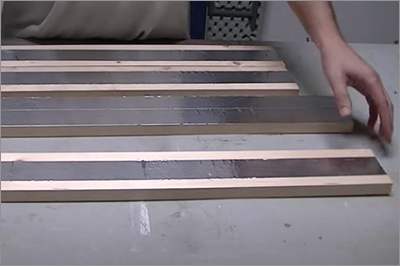
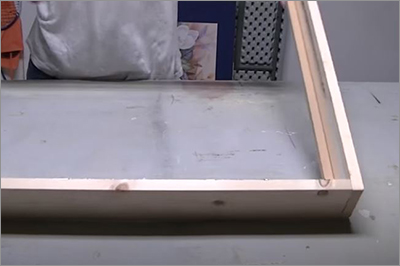
Assemble the Box Frame: Before you attach the MDF support strips to the 1×4’s, line the inside surfaces with reflective tape. I prefer to use screws to hold the 1×4’s together at the corners. This will make it easy to disassemble at a later date if you need to replace the LED lights. You can use a nail gun with small nails to attach the MDF strips to the outer frame.
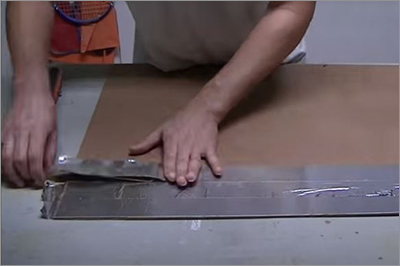
Prepare the Backer Board: Cut a piece of ¼” Thick Backer Board to fit inside the window lite box. Before you attach it to the MDF supports, you need to fully cover the board with reflective tape. Don’t be overly concerned about a few wrinkles in the tape. You will never see these once the window light box is fully assembled.
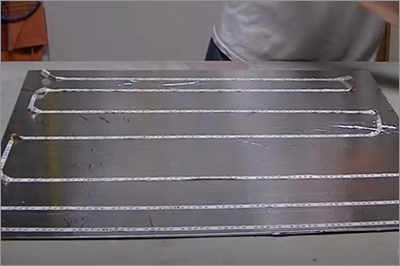
Adding the LED Lights: Purchase an adhesive backed LED light strip. Attach the LED strip to the backing board on the same side as the reflective tape. Try to create an equidistant pattern which will emit a uniform light throughout the box. Drill a hole in one side of the frame for the power cord. Be sure to test your lights before you move on to the next step.
Glass Retaining Strips: Cut 4 wooden retaining strips, and 4 backing strips to hold the glass in place. Mount the backing strips on the inside of the box about 1” down from the face. Sandwich a piece of foam poster board between the 2 pieces of glass to diffuse the light. With the glass in place, attach the 4 retaining strips in to capture the glass.
Mount the box on the wall near a wall outlet and enjoy!
[av_promobox button=’yes’ label=’Get in Touch’ link=’page,277′ link_target=” color=’theme-color’ custom_bg=’#444444′ custom_font=’#ffffff’ size=’large’ icon_select=’yes’ icon=’ue805′ font=’entypo-fontello’ box_color=’custom’ box_custom_font=’#ffffff’ box_custom_bg=’#444444′ box_custom_border=’#333333′ admin_preview_bg=” av_uid=’av-2tcw3g’]
If you want to step up from a window light box and install an actual window in the dark spaces of your home, contact our support team at (815)-634-8922.
[/av_promobox]