Window sill dry rot is a common problem on older homes. This is especially true if the home in question was poorly maintained. If the home owner neglected peeling paint or cracks in the caulking, window sill dry rot is inevitable. Once the wood is damaged, its too late for a fresh coat of paint. You will need to dig deeper and remove the dry rot. I found this handy video that demonstrates the easy steps required to remove window sill dry rot like a pro.
[youtube https://www.youtube.com/watch?v=eSpwKTWYnJQ?rel=0&w=560&h=315]
Repairing Window Sill Dry Rot | Step by Step
Damage Assessment: The first thing you need to do is assess the damage. You can easily locate the soft wood by applying pressure to the surface of the wood with a blunt object such as a screw driver handle. A tell-tale sign of the presence of dry rot, is any area where the paint has peeled off leaving the wood exposed to the elements. You should pay close attention to these areas. If the scope of the dry rot is limited to a small area, carry on with the steps below. If the damage is severe its time to contact the Window Repair Guy for pricing on replacement windows.
Remove Damaged Wood: Once you have isolated the damaged area, you need to remove the rotted wood. Use a small saw to cut the sill and the window trim. Remove any exposed screws and nails. Use a hammer or pry bar to remove the crumbling wood. To reach the bottom of the board you may need to use a hammer and chisel.
Restore Remaining Wood: If the remaining portion of the sill is soft you can firm it up by applying a coat of wood hardener directly to the surface of the wood. The liquid wood, penetrates deep into the wood.
Apply Wood Filler: This step can get a little messy, so you should mask the siding adjacent to the repair area before you apply the wood filler. Use a high-quality polyester resin to fill the void. Be sure to thoroughly mix the filler and the catalyst before application. Smooth the surface of the filler using a wide putty knife. After the resin sets you can remove the tape and use a chisel to remove any high spots. Then apply a second coat to create a flat, even surface and sand it smooth once the filler has fully cured.
Wood Replacement: Cut a small block of cedar to match the size of the existing window sill. Apply a thick bead of polyurethane wood adhesive to the back of the block then nail it in place. Then use a small plane to shape the block to mate the existing sill profile. Sand both the new block and the existing sill before applying a top coat of the wood filler.
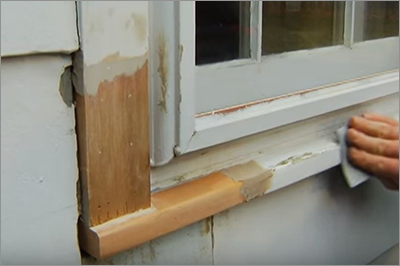
Caulk & Paint: Sand the wood filler then apply a bead of caulking along the edges of the new blocks. When the caulking is fully cured, apply a liberal coat of high-quality paint.
[av_promobox button=’yes’ label=’Get in Touch’ link=’page,277′ link_target=” color=’theme-color’ custom_bg=’#444444′ custom_font=’#ffffff’ size=’large’ icon_select=’yes’ icon=’ue805′ font=’entypo-fontello’ box_color=’custom’ box_custom_font=’#ffffff’ box_custom_bg=’#444444′ box_custom_border=’#333333′ admin_preview_bg=” av_uid=’av-2kvogh’]
Need a window inspection or pricing on window replacement or repair? Contact our support team at (815)-634-8922.
[/av_promobox]